Cardboard Robot Command
Building an Unstoppable Robot Army, One Recycled Box at a TimeProject Date(s)
The original Cardboard Robot Command was posted in 2007-2008
Additional Robots
Be sure to check out the stellar Giant Cardboard Robot Suit from KarmaAdjuster.
A Look Back at the Cardboard Robot Command
The Cardboard Robot Command was started as a repository of information to building cardboard robot costumes. There were a few models covered originally, but none as famous or beloved as the noble DRINKBOT.
For reasons of record-keeping, the original Drinkbot build instructions are stored here. Read them, follow them (if you are so bold), and dream of a future of recycled robots.
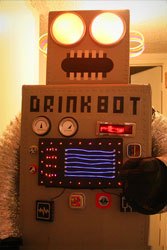
The Drinkbot
Robotics & Polynesian cocktails…
…from these two wonderful worlds the DRINKBOT arose.
As if in a fevered dream, the original DRINKBOT revealed itself to me through the unending-ly brilliant TikiBar TV. Having witnessed the mayhem and destruction wrought by that cardboard robot, it seemed the perfect model with which to begin the construction of my own Cardboard Robot Army.
And, now (2 years after the fact), for all of those whom wish to construct their own cardboard robot (and/or their own Drinkbot-like costume), I present to you — fascinating instructions!
Building a Better Drinkbot
In 12 Easy Steps!
The original Drinkbot had a great design, but suffered from A) not being able to compute “love” and B) falling apart when attacked by other robots. Seeking to improve upon that design, I built my own. It also turned out to be a rather good robot Halloween costume; but for the purposes of this site — these instructions are only to be followed by those wishing to build a robot army. If you want to make a Halloween costume, you accept full responsibility for wrapping yourself in a potentially unstoppable mechanized creation.

Step 1: Acquire Robot Parts
You’ll need/want/desire the following supplies…
- Body & head:
- Cardboard boxes into which you can fit a human body & head
- Brass fasteners (that will serve as rivets)
- See-through black fabric (for the mouth, which is where the wearer’s eyes will be)
- 2 battery-powered tap lights (for the eyes)
- Gaffer’s Tape (for reinforcing the edges)
- Flat (or low-gloss) gray paint
- Tube of glow-in-the-dark necklaces (for ear-like, glowing antennae)
- Control panel:
- Miscellaneous bottle lids & caps
- Battery-powered LED string & rope lights (for the robot’s control panel)
- Shoe box lid
- Scrolling LED belt buckle (extremely optional)
- Silver spray paint
- Foil (makes everything more robot-y)
- Arms & legs:
- Flexible dryer vent
- Silver tape
- Black gloves (to cover any human hands)
There are any number of sources for cardboard. Find some. I suggest you follow these two exceptionally poignant tips:
- If you want to build something in a boxy shape — use a box!
- If you want to build something that you’ll wear, find boxes into which you can fit! (this is especially important if you have an enormous head, such as I do)

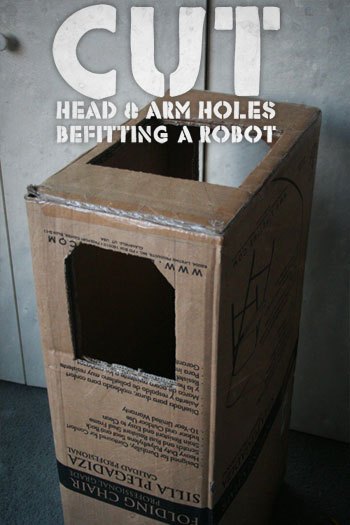
Step 2: Measure & Cut
Make openings in the large (body) box to fit YOUR head & arms… just be sure to keep the openings looking robot-y. The box for the head may not need an opening made as you might just use the open end of the box.
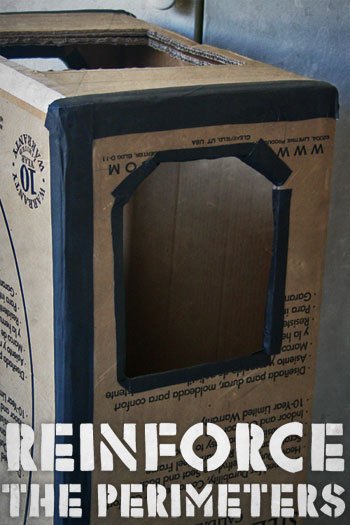
Step 3: Secure the Perimeter!
Make sure that your cardboard robot does not meet an early demise by reinforcing all edges with a heavy-duty (and paintable) tape. I enjoyed great success using gaffer’s tape.
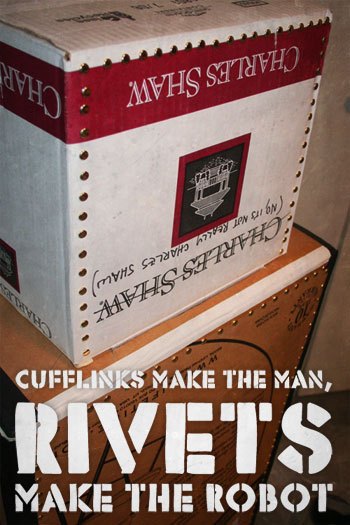
Step 4: Add Rivets, Add Realism.
Rivets are to a robot as scales are to a fish. If you forgo this step, you do so at the GREAT PERIL of your robot army. You. Have. Been. Warned.
Oh, I should mention that these “rivets” are simple brass fasteners that you can find at an office supply store… or maybe in your desk. Simply puncture them through the front surfaces of the head & body and secure them from the back. You should tape over the interior side of the fasteners, as to avoid the sharp metal catching on your clothing or scraping your skin.
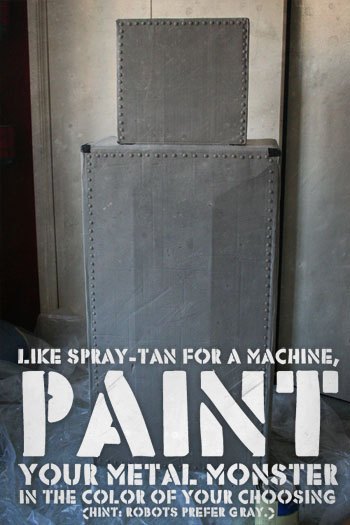
Step 5: Paint
Paint all surfaces in beautiful gray. Other colors work too, but gray is far-and-away, hands-down, absolutely, spot-on the best robot color ever. A glossy white can be used if you want your robot to look like it was made by Apple.
Notice that the rivets are covered in paint now & look rather realistic. Also notice that the tape has taken the paint quite well (which is why you should use a paintable tape).
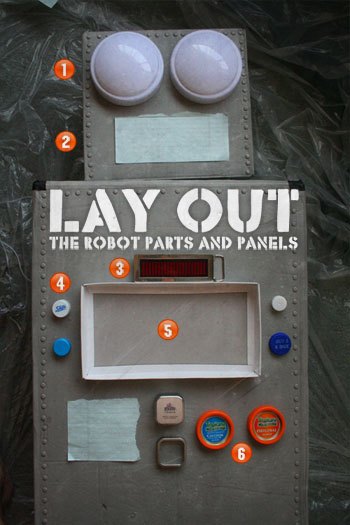
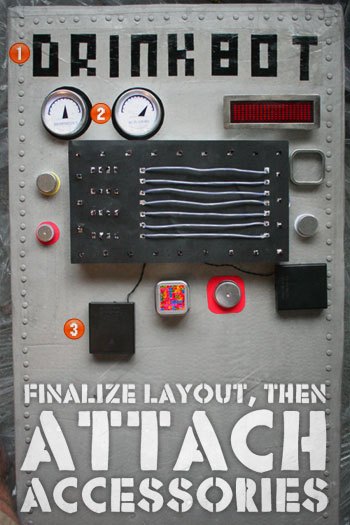
Step 6: Even a Robot Likes to Accessorize
Pick out the items that you’re going to use as the robot’s parts and lay them out over the boxes (but do not yet attach them). Here are the parts I’ve used:
- Battery-powered tap-lights
- This paper is a place-holder for the future location of the mouth (through which the wearer will see)
- Scrolling LED belt buckle (great for adding status/command display so that the viewing public will know what’s going on with the robot)
- Bottle caps from a 2-liter soda bottle
- A shoe box lid
- Lids from bottled orange juice
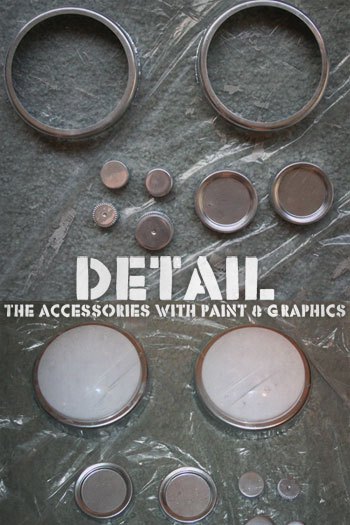
Step 7: More Painting
Spray those common parts with silver paint and, SUDDENLY, household trash becomes robot treasure.
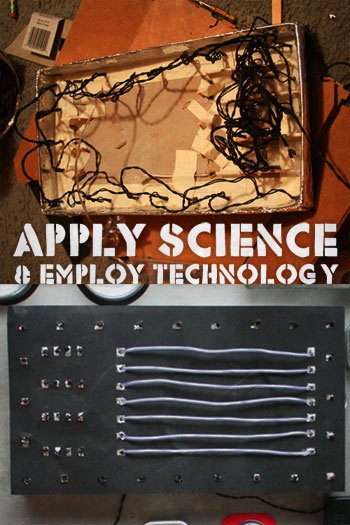
Step 8: SCIENCE
Here is the tough part. Employing science & technology to make the robot… er… robotic.
I covered the top of the shoe box lid in foil (to give it sparkle & reflection), then poked a series of holes to accommodate 2 strings of LED lights and 1 wrapped rope light.
To provide a background on which the lights would stand out more, I added black paper over the foil (with square holes slightly larger than the holes for the lights — so that some of the foil would show through).
After the box lid was set, I went about securing all the lights in place with a lot of tape & a glue gun. It’s best to make sure that the LED lights are pointing straight out of the box lid. As you’ll see in Step #9 below, I left the battery packs for the lights on the outside of the robot (to enable changing of batteries and as an added decoration).
The LED string lights were picked up for $3 a set (one orange, one purple) at a local drugstore (Rite Aid) during their Halloween decoration/costume season. The rope light was sold by IKEA (for a few dollars) for one season as a Christmas tree lighting set-up. Since it’s probably impossible to find anymore, you can substitute other types of battery-powered lights here.
Note: if I was doing this over, I’d use something more substantial than a shoe box lid (to better hold the lights in place).
Step 9: Make a Commitment
Secure your parts and control panel to the robot body. I suggest using Elmer’s glue and gaffer’s tape for most of the parts. Use stick-on Velco strips for any elements that you’ll need to move/remove (such as the battery packs and scrolling LED belt buckle which need to come off during battery exchange)
- I added some decorative text (“DRINKBOT”) by cutting out black paper letters then affixing them with Modge Podge. Yeah, that’s right, I’m down with Modge Podge.
- I created some very basic “dials” in a graphic design program, printed them out & affixed them to the orange juice lids with glue. If you want to use the same, overly simplistic dials — I’ve posted them for download here.
- These black boxes are the battery packs for the LED lights in the “control panel.” A little paint (in a later step) and they become part of the robot’s decoration.
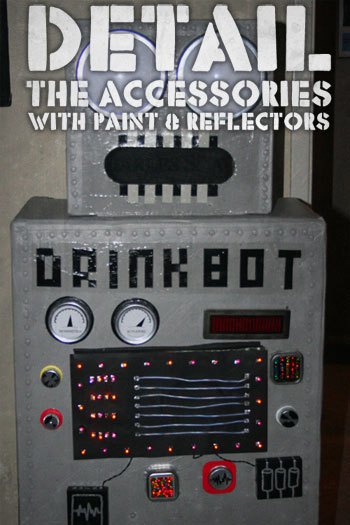
Step 10: Robots Like Details
It’s true. The more detail you add, the more detailed your robot will look. Robots just love this sort of thing. They spend so much of their time computing numbers and plotting world domination, that some nice decorative details really give them a chance to relax & ponder the simpler aspects of life (like flowers and reciting Pi to one million digits).
One important part of this step is creating the mouth (through which anyone wearing this costume… or, should I say, unstoppable robotic blah blah blah… will see). For the DRINKBOT, I made a robotic, teeth-like grill out of black & white paper then added a large opening that I covered with a see-through black mesh. Be warned: if you try to wear this out & about, people will most likely attempt to drunkenly stick objects into the robots mouth — which will, in turn, be jabbing your directly in your human face.
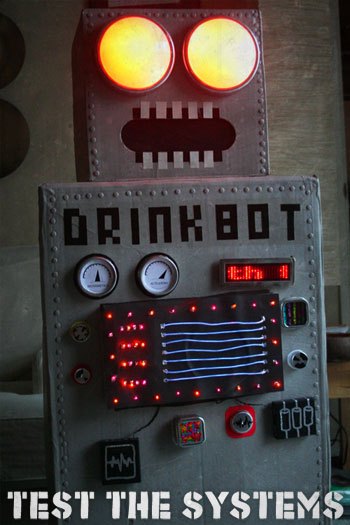
Step 11: It’s Easy from Here
Before you get too excited, be sure to thoroughly test all of the systems — make sure that the lights will stay lit & the various parts will stay on during robot army activities.
Step 12: The Launch of Your Robot Army
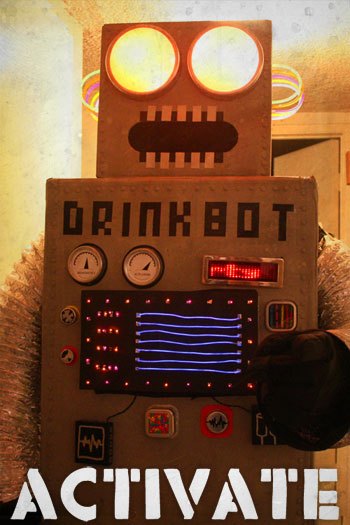
Take the final steps:
- Add some flexible dryer duct (in silver or white) for the arms & legs (be sure to purchase a width into which your arms and/or legs can fit)
- Bend some glow necklaces ($1 for a tube of 10 at a local craft shop (Michael’s)) into ear-like antennae
Then… ACTIVATE
this is the most amazing cardboard robot i have ever seen. im going to make one tomorrow. mine is not going to be a costume but i have a robot obsession so its going to sit in my room and be a night light. thanks for the great instructions!
This is really helpful. I’m printing this out. I’m making a robot tomorrow. Thanks for posting this.
I want to make a robot!! This looks like a big project
DRINKBOT FTW
I am a robot and I need a mate like this. Please advise.
Wise advise, succinctly put. I have now, at my command, almost one and a half fully non-functioning cardboard based robot minions to do my bidding. The second will be finished soon, once I have purchased some more gaffer tape. You, Sir, are truly a genius. Thank you.